Page «Targets»
Targets
On the page entitled
“Targets”, there is a list of the Targets that have so far been assigned to the
Glass utility. The list contains the
contextual menu from which operations upon the various Targets may be referenced
and edited. Double-clicking on a listed
item calls up the interface needed for editing an existing Target as does the
Edit button. More
about targets…
Note: Among the list of Targets, there is on named (Default). This Target cannot be deleted and it works
for the entire Screen (Target type is “Whole Screen”).
The Add button allows for the creation of a new Target.
Several types of Targets are
assignable:
·
Whole Screen -- specifies using
the “Whole Screen” as a Target, as opposed to specific windows or programs on a
screen.
·
Select Application
with mouse -- specifies a specific application -- that is, all windows that are
running based on calls from a single program (.exe) file. When this choice is desired, the method for
setting this type of Target is as follows.
Move the mouse cursor over an application and the edges of that application
will be surrounded by a red blinking frame.
Also, a corner of this blinking frame will contain a hint-window
indicating the particulars of the application selected. This hint-window further contains reminders
of the HotKeys to be used in confirming the application selection.
o
The key for “Toggle
Info” cycles through the extended information concerning the application’s
window and its elements.
o
The key for “Select
Target” confirms the choice of a window and allows it to be added to the
list of Targets.
o
The key for “Exit”
cancels this mode
·
If the “Select
Target” key has been pressed, this means that you have chosen the Target
(application) and a further dialogue will appear. This dialog allows for Target input and
editing. Selecting “OK” add the Target
to the list.
·
Select Window or
Control with mouse. This mode
works similar to that described previously, except that the entire application
is not selected – rather a sigle element or window within the application. With this mode, specific buttons, panels,
windows, etc. may be chosen. When the
mouse moves over the various elements, they are surrounded by a blinking green
frame.
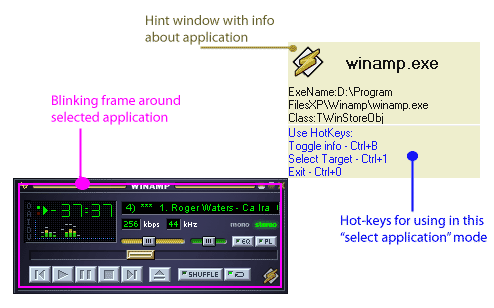
Mode «Selection of the application»
Edit
Target
When chosen, this item brings up a dialogue for editing the parameters
for a Target. Targets have the following
fields and options:
Target Type. The type of the Target is shown. There are three Target types:
“Whole Screen”, “Application”, and “Window or
Element”. These have been previously
described.
·
Name of an
exe-file. The field specifies which
application is the designated Target.
·
Name of the
Target. This field sets the name of the
Target. This name will be shown in the
list, representative of this Target. Two
identical names may not be used, therefore the program
itself will rename identically named Targets by adding a number to the end of
the given name.
·
Comment. In this field, a comment may be added to
remind the user how Target is to be used or the reason behind its particular
setup. This comment will appear at the
far right side of of the list.
Following are the option for the
“Auto-Switcher”:
Active for «Auto-Switcher». This checkbox
designates whether this particular Target will be processed by the
Auto-Switcher”, or not. If unchecked,
Auto-Switcher will ignore this Target.
This is a quick way to temporarily disable a Target without deleting it.
Assigned Profile. This field
indicates the Profile that will be assigned to the
Target when the Target is detected to be under the cursor or caret. The Glass will only be changed if
Auto-Switcher is turned on and finds an active Target.
Glass
on the Target may become:
·
Visible. If this option is chosen, then the Glass will
be visible and altered per the chosen Profile.
·
Invisible. If this option is selected then the Glass will
not appear, regardless of other settings.
Auto-Switcher
will react on:
·
Cursor and caret. In this mode, Auto-Switcher is sensitive to
both the mouse cursor and the text caret.
·
Cursor. Auto-Switcher will be attentive to the mouse
cursor, only.
·
Caret. Auto-Switcher will be attentive to the text
caret, only.
Compare. This indicates the
“Type of the Target” as discussed previously.
·
Name of an
exe-file. At the analysis of a Target
under the cursor, the Auto-Switcher will compare only the named executable file
of an application.
·
Window or
element. Auto-Switcher will compare
the information about the windows or elements inside of windows. Actions will only be taken based on a
reaction to these specified parts of a running program.
Info for
comparison. This list contains the information which will be
used by Auto-Switcher as it searches and compares Targets. The same information it uses will appear in
the hint-window, as extended information, in the “selection of the application”
mode.
System menu of Magnifying
Glass Pro
The Magnifying Glass Pro icon appears in the tasks panel, near the
Windows clock, when the application is running.
Clicking on this icon with the right mouse button will bring up the
system menu for the program. This menu
contains the primary commands and options for the program concerning both its
interaction with the user and with the other applications running in the
Windows environment.
Show glass. This is used to either show or hide the
Glass.
Show a Command mode. This invokes the Command
Mode for the Glass.
Command mode enabled. When not marked, the Command Mode is disabled
for HotKeys and MouseShaking. All
options are still available through direct action with the mouse on the menu.
MouseShaking enabled. This item, when marked, tells the program to
track the movements of the mouse and react accordingly,
toggling other features on or off when certain criteria are met.
Auto-Switch
Profiles on the Targets. By this item, Auto-Switcher
may be switched on or off.
Switch to Profile. With this menu, it is possible to manually
change to a different Profile, regardless of what
program is under the cursor or caret.
Note that, if Auto-Switcher is active, it effectively takes precedence
over this setting, as it resets the chosen Profile instantly when it detects a
programmed Target/Profile combination.
Therefore, to manually switch between Profiles, first disable
Auto-Swither.
Note that there are several other settings that may be made in the list
of Targets to vary their operaition.
Options main
dialog. This invokes the main window of
the Magnifying Glass Pro application.
Help. Brings up the Help file.
Exit. Returns the user
to the mundane and boring world of 1x …. That is, it exits the program!
This simple chart shows the
different meanings for the tray icon:
|
|
Glass Black |
Glass is available but is NOT
active |
|
|
Glass White |
Glass is available and is ACTIVE |
|
|
Glass Obscured |
Glass is available and is ACTIVE
and is INVISIBLE |
|
|
Glass with red "A" |
Auto-Switcher is ACTIVE |
|
|
Glass without "A" |
Auto-Switcher is NOT active |
|
|
No Glass Icon |
Magnifier application is NOT
running |


